
Any fundamentals of audio production or acoustics course will include a discussion on the Fletcher-Munson Equal Loudness Contours. It is important for audio engineers to understand the implications of this graphic representation in terms of mixing, mastering and how listeners will perceive the music they produce.

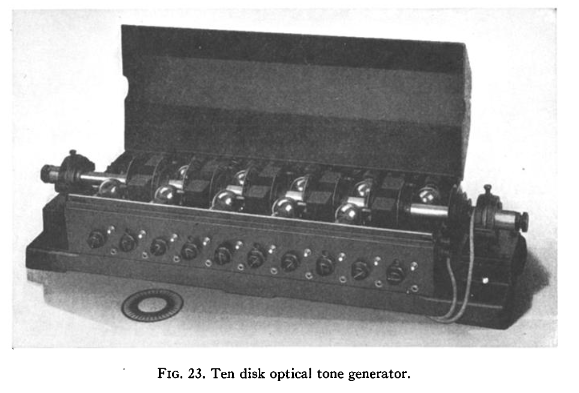
A tone producing machine used by Fletcher and Munson (source)
Two individuals may perceive the same source to be at different loudness levels. Loudness also varies across species, as anyone with a dog or cat can attest. Perceived loudness is also highly dependent on frequency and the limitations of the listener. Amplitude, on the other hand, is something that can be measured precisely by instruments like a sound pressure meter. A Pascal (named after mathematician and physicist, Blaise Pascal) is a unit of measurement for pressure and the threshold of human hearing is considered to be 20 millionths of a Pascal in terms of sound pressure level (expressed as 20 x 10 -6 Pa or .00002 Pa). That is an incredibly small amount of pressure! Using absolute measures like Pascals to describe amplitude would be cumbersome and needlessly precise in terms of audio production, so decibels are used to describe amplitude levels and changes in relative terms. As a practicing engineer, you will quickly get accustomed to the effect of changing the level on a track by 3 dB, 6 dB, 12 dB, etc. A doubling or halving of amplitude is often perceived when a change of 10 to 12 dB is implemented. Noticeable loudness differences are perceived at changes of 2 to 3 dB for most people. It’s important to realize that decibels are relative units, meaning they require a reference value or beginning value to be meaningful. So -3 dBFS (FS = full scale and refers to digital audio systems) is essentially meaningless unless you are comparing it to the loudness perceived at 0 dBFS or unity gain. Measuring loudness with an SPL meter will provide decibel units relative to the threshold of human hearing or 0 dBSPL. So if normal conversation in a room is said to be at a level of 65 dBSPL, you might expect things to get twice as loud (around 77 dBSPL) during a Buffalo Bills football game, for example.
Once you wrap your head around relative values like decibels and the subjectivity of loudness in general, considering frequency adds yet another layer of complexity. Human perception of loudness varies across the frequency spectrum. This is the essence of what Harvey Fletcher and W. A. Munson investigated in 1933 at Bell Labs. Because everyone’s ability to hear is slightly different, they needed to derive an average to get a meaningful representation of human hearing across the audible spectrum. They were the first to test this sort of human hearing sensitivity in a study that included a large sample of people to get an average statistical result. They published their findings in a paper titled “Loudness, Its Definition, Measurement and Calculation.”
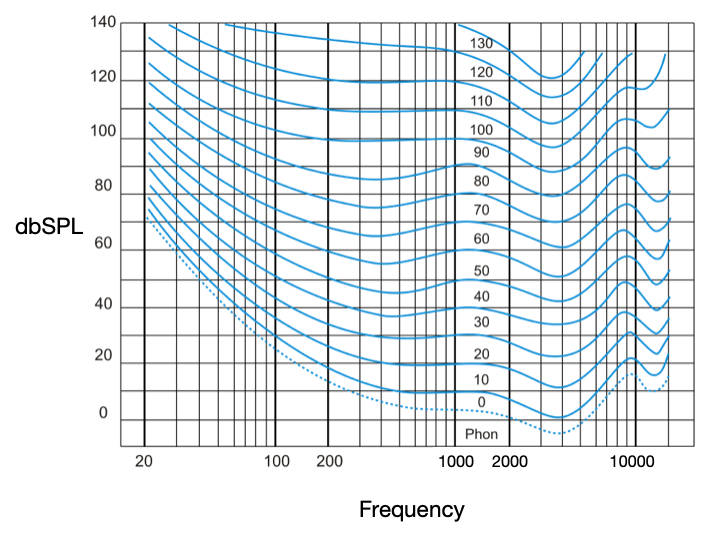
Since the original study, there have been refinements and revisions which have resulted in the current ISO 226 (International Organization for Standardization) seen below. The graphic is now commonly referred to as the Equal-Loudness Contours.

The X-Axis represents frequency across the spectrum and the Y-Axis identifies amplitude at various levels. The phon is a unit of loudness perceived to be equal to the intensity in decibels of a 1 kHz tone. So a 1,000 Hz sine wave played at 40 dBSPL is equivalent in loudness to 40 phons. So for all practical purposes, we can think of relative changes in phons to be equivalent to relative changes in dBSPL in terms of loudness.
Every point along a shape or contour represents a frequency at a particular amplitude. The important thing to note, and the essence of this graphic, is that every point that lies on the same shape or contour will be perceived as having equal loudness to the average person. For example, locate the blue line that crosses the 200 Hz line at around 50 dBSPL in the image above. Now follow that line to the left until it crosses the 100 Hz line. Note that the corresponding amplitude is now around 59 dBSPL. This means that in order for a person to hear a 100 Hz tone at the same loudness as a 200 Hz tone played at 50 dBSPL, it would have to be increased by 9 dB. Or in other words, we as a species are substantially more sensitive to a 200 Hz tone compared to a 100 Hz tone at this particular level.
Things change when we increase the overall level. Look at the 200 Hz line at 120 dBSPL and follow the contour to the 100 Hz line. Now we see that the level needed to create an equally loud 100 Hz tone is only 2 dB higher, or 122 dBSPL. So although we still are more sensitive to the 200 Hz tone, the difference between the perceived loudness of the two frequencies has become significantly smaller. As the overall level is increased the contours flatten out, especially below 1 kHz. This means we will perceive louder bass frequencies as we increase the overall volume.
Looking at the right-hand side of the graphic we can see a dip at around 4,000 Hz. Using the same logic, this means that we are more sensitive to this frequency range than any other. But there is a difference when the overall level is increased as compared to low end frequencies.
ADVERTISEMENTFor example, find the point where the 4,000 Hz line crosses 35 dBSPL and follow that contour to the left to the 1,000 Hz line. We see that it crosses around 40 dBSPL, a 5 dB difference. Looking at the 4,000 Hz line at 120 dBSPL, we see that the equal loudness at 1,000 Hz would be a difference of a whopping 20 dBSPL. This means that the 4,000 Hz tone would be perceived as being 20 dBSPL louder!
The ramifications of these contours are enormous in terms of mixing and mastering. I think everyone would agree that the ideal mix should sound good at all volume levels, meaning that the balance across the spectrum should be as was intended by the mix engineer. There are many factors that make this a challenging proposition such as the playback system of the listener, the acoustics of the room and the fidelity of the headphones/speakers. These things are unknowable and uncontrollable. But we can operate with the knowledge of the psychoacoustic phenomenon we’ve been discussing here as represented by the equal-loudness contours. The solution is to start with a relatively neutral sound at an average level that will translate well to multiple listening situations.
Mixing at louder than average levels will cause the engineer to overcompensate in the low frequencies by over-attenuating the bass to balance the sound with the perceived loudness of higher frequencies. So when the mix is played back at lower volumes, the bass will sound thin.
Mixing at very soft levels will have the opposite effect, as the engineer will overcompensate for a weak-sounding low end. So when the mix is played back at louder volumes, the bass will be overpowering.
The solution is to find a happy middle ground which most engineers define as somewhere between 70 and 85 dBSPL at the most. This is a relatively safe range in terms of both accurately perceived spectral balance and listener fatigue, which is another issue. Long periods of listening, especially at louder volumes, will corrupt your ability to make good decisions. See my article on best practices here.
It is also a good practice to spot-check the mix at very low and very loud levels to hear how it responds to extreme situations. There will always be a compromise involved. Perhaps your listeners will be savvy enough to make their own adjustments based on their system. I still have a Denon receiver I bought in the mid 80s (one of the few pieces of technology that has withstood the test of time), and it has a control called variable loudness. This control adjusts the low end volume based on the overall volume to keep the spectrum balanced. This is much different from a straight-ahead bass tone control.

Always be aware of listening levels as you mix, not just for the sake of the spectral balance, but for the safety of your ears. The goal should be to find a good compromise so that the mix translates well to a variety of situations. Before making radical adjustments, consider how things sound at other listening levels and be cognizant of our limitations as human beings.
Some great references below for the curious and autodidactic:

It doesn’t have to take years to train your ears.
Get started today — and you’ll be amazed at how quickly using Quiztones for just a few minutes a day will improve your mixes, recordings, and productions!
Ballou, Glen M. Handbook for Sound Engineers. Elsevier / Focal Press, 2008.
Everest, F. Alton. Critical Listening Skills for Audio Professionals. Thomson Course Technology, 2007.
Everest, F. Alton., and Ken C. Pohlmann. Master Handbook of Acoustics. McGraw-Hill, 2009.
Howard, David M., et al. Acoustics and Psychoacoustics. Focal Press, 2013.
William, Moylan. Understanding and Crafting the Mix: the Art of Recording. Focal Press, 2013.
Check out my other articles, reviews and interviews
Follow me on Twitter / Instagram / YouTube

Philip Mantione is a composer, synthesist, guitarist, educator and sound artist active in the LA experimental music scene. His music has been presented in festivals, museums and galleries worldwide. His current project is TriAngular Bent, an electroacoustic trio featuring Don Preston (founding member of Frank Zappa’s Mothers of Invention) and circuit bending virtuoso, Jeff Boynton. Details at philipmantione.com